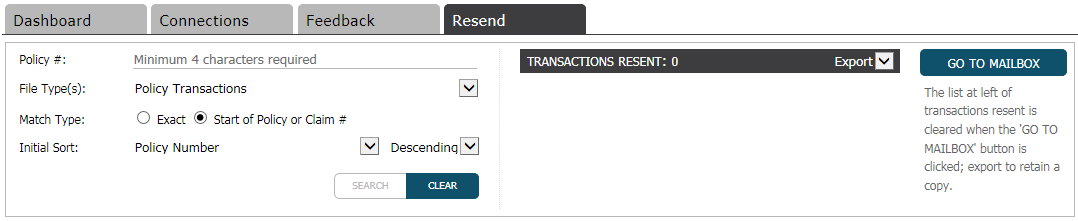
Resend
The Resend tab allows for quick
access to search for a specific policy, claim, or eDoc transaction, and
resend it by adding the transaction to the active queue so that it can
be downloaded again. If a carrier does not choose to enable policy/claim/eDoc
resend, you will not be able to use this feature for transactions from
that carrier.
Note: This
option is intended to locate individual transactions. To resend an entire
file, locate the file in the Received Files
area.
- From the Exchange home page, click the Resend
tab.
- Enter at least four characters of the policy or claim number in
the Policy #/Claim # field.
- Select a File Type of
Policy Transactions
(default),
Claim Transactions, eDoc
Transactions, or
Policy, Claim, and eDoc Transactions.
- To determine where the criteria you entered in step 2 should correspond
to the policy/claim number, choose a Match
Type of
Exact (you have entered the entire number), or Start of Policy or Claim # (default).
- Choose an Initial
Sort as well as a sort order for the results list.
- Click Search.
- A list of results displays. Select the checkbox
for each transaction you wish to resend.
To narrow the results, type a portion of the content of any of the
columns in the Find: field.
The list refreshes automatically as you type.
To see this data in a spreadsheet, click the Export
dropdown arrow and select CSV.
To sort by any of the columns in the list of search results, click
the column header.
To sort in the reverse order, click the column
header again. The header of the column currently used
as a sorter displays in italics.
The list displays the most recent transaction for each policy number.
If it cannot be determined which of two or more transactions is the
most recent, multiple transactions for the policy display and are
marked in red. Additionally, the message We
are unable to determine the latest version of the transactions that
display in red. Note that resending these transactions could cause
duplicates in your system displays in red above the list.
- Select the checkbox
for each transaction you wish to resend, and click the Resend Checked Item(s) button.
- A popup message displays indicating the files have been resent.
Click OK.
To review the Transactions Resent
in a spreadsheet, click the Export
dropdown arrow and select CSV.
To review your Inbox or Received files, click Go To Mailbox.