Connections
The Connections Report provides your brokerage with a visual presentation
of your brokerage download options by insurer. This report shows all inactive
download connections that are available to your brokerage includes eDocs
& Messages. This content presented on this tab is informational only,
and any selections made will not alter your current download.
If activity on a line of business has stopped for a period of 12 months,
the connection status changes from DL
(Downloading) to SC (Agency Management
System Configured).

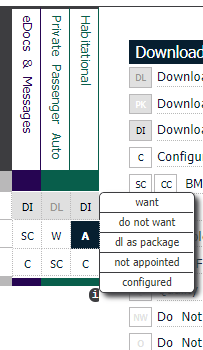
The items across the top of the chart represent the available lines
of business available.
Your insurer partners that download are listed down the left.
These display ten per page. To see any insurers beyond the first ten,
click the arrows at the bottom of the screen to scroll through the chart.
Insurer partners whose names are underlined indicates that the insurer
has provided contact information. Click on the insurer’s
name to display their contact card. The Interface
Contacts tab contains contact information and brief insurer-provided
notes about the contact. The icon  indicates the preferred
contact method for the contact. Clicking the dropdown menu positioned
directly beneath the insurer's name allows you to navigate through the
contact categories, if more than one category was provided.
indicates the preferred
contact method for the contact. Clicking the dropdown menu positioned
directly beneath the insurer's name allows you to navigate through the
contact categories, if more than one category was provided.
Note: Each
insurer is responsible for providing all of interface contact information.
All questions or concerns about this information should be directed to
the insurer.
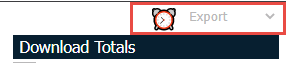
To export the information to a Microsoft
Excel document, click the Export
dropdown arrow and select Connections.
- Cells marked with DL indicate
lines of business you are currently downloading with
- Any cell marked with an A
indicates that this line of business is available or that this particular
insurer is downloading to other brokers but not to yours
- Cells marked with PK indicate
that a line of business you are currently downloading is part of a
package
- Blank cells indicate that the insurer is not currently downloading
this line of business
The Download Totals on the
right provides a summary of all of the available connections options reflected
in your report. The totals for each category increase or decrease with
every report adjustment you make.
To change the category for a specific insurer and line of business,
click in the correct cell and choose the desired option.
To help you navigate and ensure that you are working in the proper spot
on the report, hover your mouse on the cell for a cue on the insurer and
line of business that cell represents.
At any point, you can export your entire Connections
Report to Microsoft Excel
to further analyze and share with others in your brokerage. The exported
file is saved automatically as Connections
Report, your Mailbox account, and today’s date. You can refer to
the second tab for a quick reminder of what each of the symbols represents.
In the pop-up window that displays, click Open
to view the information immediately or click Save
to save the file locally.
Note: Customizing
your report will not alter your
download and is for informational purposes only.
The Ivans Carrier Partners Reference
Guide link enables you to view each insurer’s Download and Real-Time
capabilities along with the types of eDocs and Messages each insurer supports.
Note: The
guide is updated on a monthly basis.
Report Scheduler
The Report Scheduler allows
the Admin in your brokerage to send email notifications automatically
when a insurer makes a Line of Business available.
To access the scheduler, click the alarm
clock icon  that is located next to Export
on the Connections tab screen.
that is located next to Export
on the Connections tab screen.
Connections Report Change Notification
- The Report Scheduler Delivery
screen displays with the Change
Notifications tab selected. Here you can set up the delivery
of email notifications when a inusurer makes a Line of Business available.
The sending of the change notifications is enabled by default. If
you want to disable it, click the Enabled
dropdown menu and select No.
Note: If
accessing the Report Scheduler Delivery
screen for the first time, the Change
Notification tab will default selected. All other times the
tab that is selected when exiting the screen will display selected
the next time you access the screen.
- Select the recipients of the email notifications by checking the
checkboxes next to their names. The recipient list will only shows
users in the organization that have the ConnectionGrid
- View permission.
Note: If
no recipients are selected for an enabled Connections
Report Change Notification, no email will be delivered.
- The notification will be delivered via email when a new Line of
Business is added for a insurer. The details of the change are contained
within the email.
Note: The
email notifications are sent on the Monday after the Line of Business
becomes available. If no insurer changes are made, no email is sent.
- Click Save
to save your changes.
Note: If
you made changes on the Scheduled
Delivery tab, clicking Save
here saves the changes on both tabs.
Connections Report Scheduled Delivery
- Click the Scheduled Delivery
tab if the tab is not selected by default.
Note: If
accessing the Report Scheduler Delivery
screen for the first time the Change
Notification tab will default selected. All other times the
tab that is selected when exiting the screen will display selected
the next time you access the screen.
- Here you can set up the delivery of the Connections
report. The delivery of the Connections
Report is enabled by default. If you want to disable it click
the Enabled dropdown menu
and select No.
- Select the recipients of the report by checking the checkboxes
next to their names. The recipient list will only shows users in the
organization that have the ConnectionGrid
- View permission.
Note: If
no recipients are selected for an enabled Connections
Report Schedule, no report will be delivered.
- The report will be delivered via email with the Connections
Report attached as a Microsoft
Office Excel file.
The report can be delivered every week or every month. The delivery
frequency defaults to weekly: to have it delivered monthly, click
the Every dropdown and select
Month.
Note: The
report will be sent out every Monday if set to weekly delivery, and
the first Monday of every month if sent to monthly delivery.
- Click Save
to save your changes.
Note: If
changes were made on the Change
Notification tab, clicking Save
here saves the changes on both tabs.